What do you do with an ugly wallpapered wall when you'd rather not spend days scraping it off? Cover it up! My friend Angie recently did just that.
I invited her to share her experience with us, because for six hours of labor she now gets to bask in the glory of her statement wall every time she walks through the front door.

Hello from South Dakota!
I'm Angie, and I'm excited to be the very first guest blogger on Top Shelf DIY! I have known your lovely hostess for more than 10 years, and she inspires me with her creativity and skill, her excellent taste in wine and food... and she makes cute babies! 😉
I am brand new to DIY, and so far I am enjoying the learning process and the sense of accomplishment that comes with a completed project.
My husband and I bought our first house just over a year ago. I adore old houses. Ours was built in 1910 and was kept in excellent shape by the previous owners.
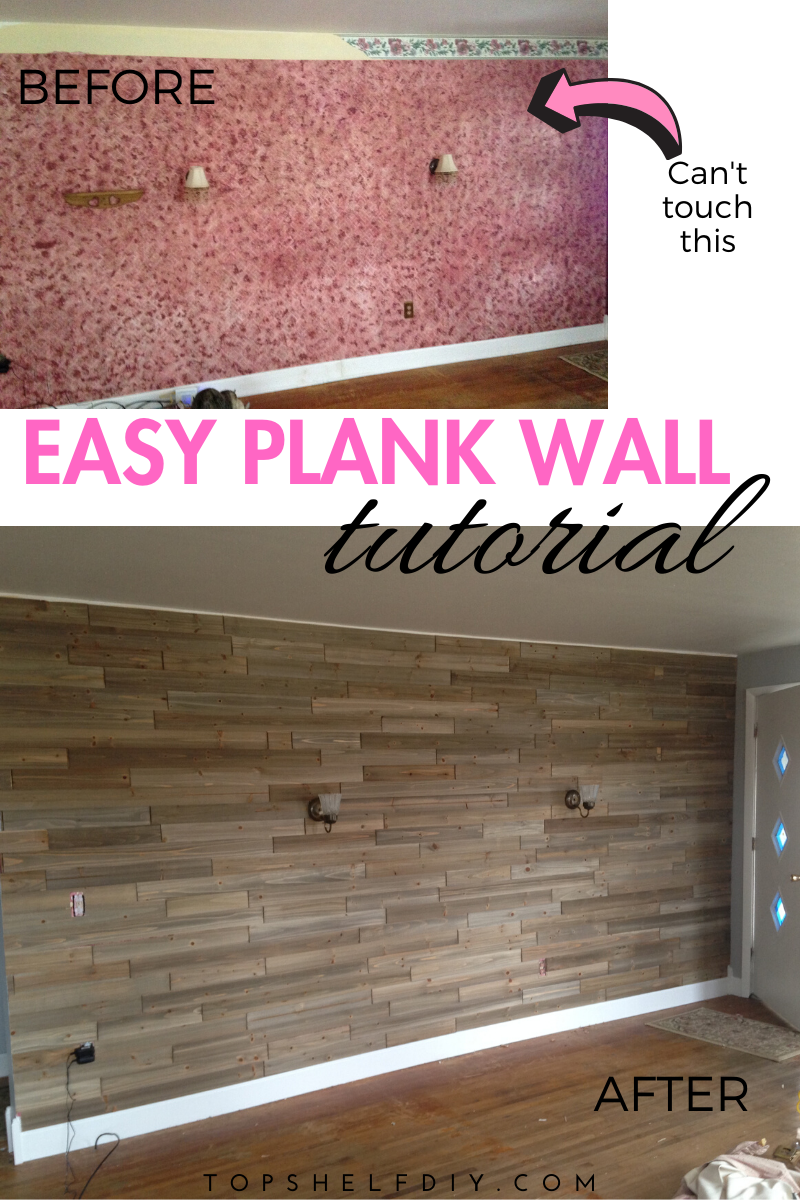
My very first DIY project involved a 16-foot wall covered in wallpaper in the living room. And not just any wallpaper - wallpaper that someone had sponge-painted maroon, cotton candy pink and glittery gold, topped by a matching floral wallpaper border that went all the way around the room.
Needless to say, not my style.
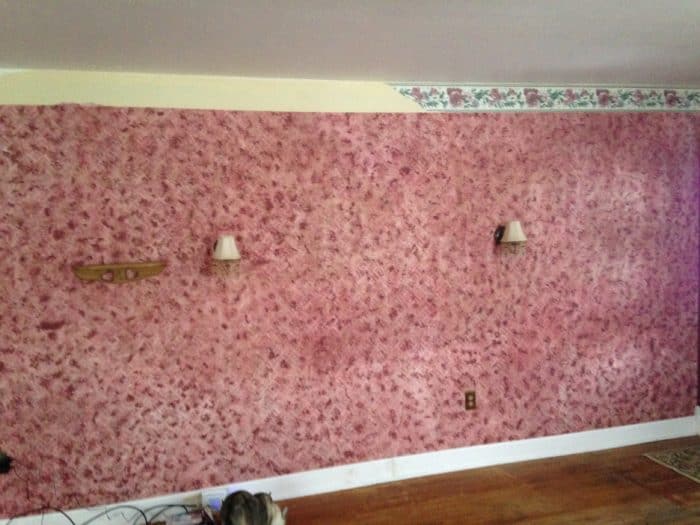
If you stare at it long enough, eventually you'll see a 3D hot pink cheetah...
I had taken down the wallpaper border on the other walls in this room, and just that small amount was enough to make me despise the removal process. The thought of spraying wallpaper remover and scraping, followed by at least one cycle of re-spraying and scraping an entire wall's worth of wallpaper made me die a little inside.
I wanted to keep that wall as an accent wall, so I turned to Pinterest (where else?!) for ideas.
Why go with a shiplap look?
Shiplap is everywhere on Pinterest.
There are lots of ways to go about installing it - some more expensive and time-consuming than others. I thought shiplap or something similar would be a good way to cover up the wallpaper, but I was daunted by the installation process, especially since this was my first DIY project ever. I told my father-in-law, who is also a DIYer, about my lazy girl workaround: buying sheet paneling and putting it up horizontally.
Sheet paneling generally comes in 8-foot panels, and since this wall was about 16 feet long, he pointed out that I'd have a vertical seam in the middle of the wall where the panels met that would be difficult to disguise. I knew he was right, so I wasn't sure what to do next.
Editor's note: She could have cut the panels at varying lengths. This would have created the same plank effect.
A few days later, he found this reclaimed wood wall plank kit at Lowe's. I immediately ordered enough to cover the wall.
When it arrived, it smelled like cedar chips - bonus! Each box came with wood planks of varying lengths, all tongue and groove edges, so they nestled together neatly. The planks are about 1/8 of an inch thick and therefore very lightweight. You can stain or paint them if you want, but I really like the weathered look, so I left them as-is.
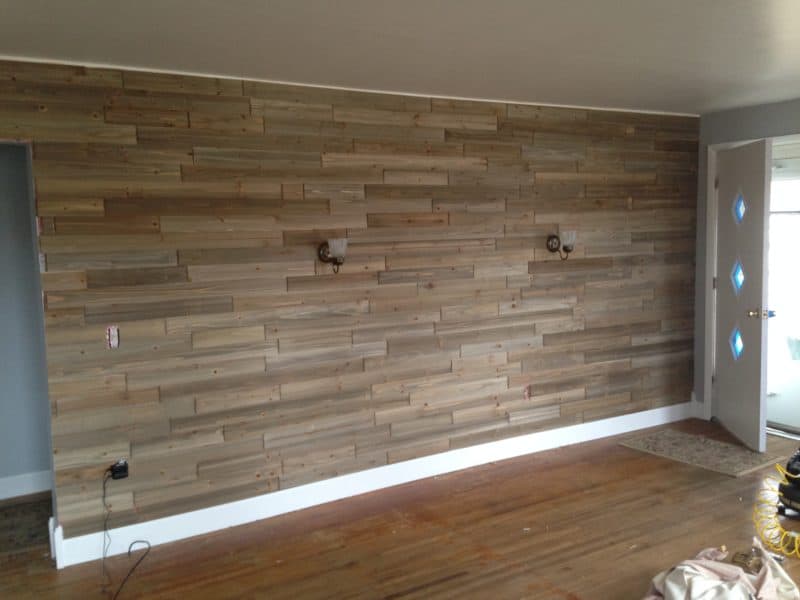
It was so easy and fun to create my own wall!
Easy Plank Wall Install Process
Disclaimer: this post includes affiliate links for your convenience, which means I may earn a small commission should you purchase any of the items recommended below.
Materials
- Stud finder
- Level
- Nail gun
- 2-inch brad nails
- Liquid Nails construction adhesive (one tube is all you need)
- Outlet extender (optional)
- Plywood underlayment or a pre-fabricated tongue and groove plank kit
Steps
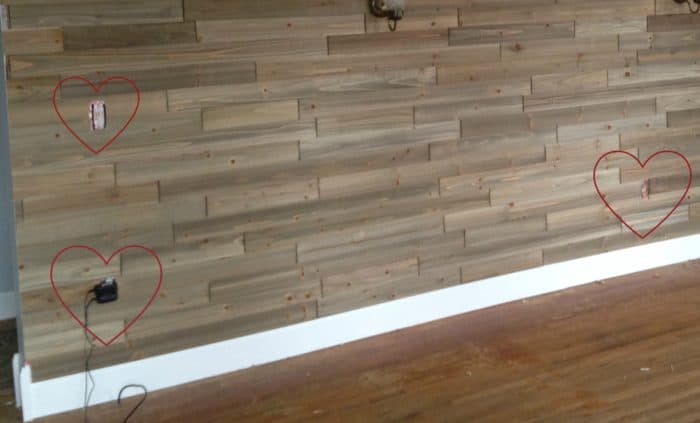
1. Remove outlet covers. Depending on the width of your planks, you may also need to add outlet extenders so that the outlet is flush with the new wall. You can see how Erin did this in her Shiplap Office here.
2. For this particular tutorial, no wall prep was required. However, if you're doing shiplap, you may want to paint the existing wall white so that any gaps between the boards appear white.
3. Locate your studs using a stud finder, and mark them vertically along your wall. This will ensure you're nailing your pieces to the inner framework of your wall.
4. Start from the top of your baseboard and work your way up, nailing pieces as you go. If your pieces are heavy, apply Liquid Nails to the back immediately before nailing. Use your level to make sure the first row is level. Walls and ceilings are rarely perfectly straight!
Editor's note: you can also start from the ceiling and work your way down. Personal preference. If planning to install new baseboard, I recommend starting with the ceiling and working your way down. The baseboard can be installed right on top of your shiplap.
5. Depending on the width of your planks, you may have to rip (i.e. reduce the width) of your pieces once you get to the last row. This can be done with a table saw or jig saw. If using plywood underlayment, the cutting department at Lowes will usually rip pieces for you.
6. Replace your electrical plate covers if necessary.
7. Sit back, relax, and soak in that amazing view every day for the rest of your life.
*Note: I didn't need outlet extenders because my pieces were only 1/8 of an inch thick. I also didn't need to use liquid nails because the pieces were so light.
Shiplap or Planking - What's the Difference?
With Shiplap:
- you want a small gap between your boards (using a dime or tile spacer).
- you'll have an easier time hiding imperfections such as nail holes because you'll be able to use wood filler and spackle prior to painting.
- slightly more time and cost involved due to materials used.
With Planking:
- no gap between your boards.
- less forgiving with blemishes since the final product is usually left raw.
- less time needed for install since it comes pre-cut in a kit and does not require painting or finish work.
As you can see, I had at least three outlet covers to remove:
I completed the wall in about 6 hours. My father-in-law cut pieces to fit at the end of each row.
Total cost: $245.
Later, we framed and installed a door in the doorway on the left side.
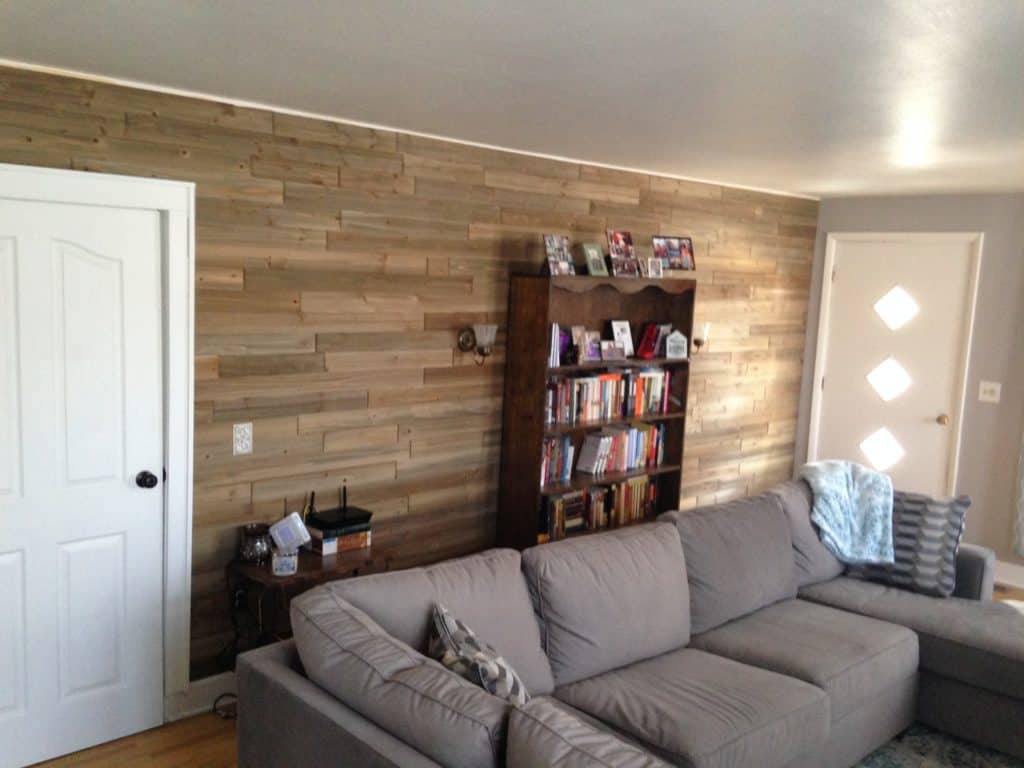
This wall is hands down my favorite feature in the house. Every time someone comes over and sees it for the first time, they tell me how much they love it, and they're amazed when I tell them how easy it was!
In case you need a little more inspiration, here are a few more tutorials worth reading:
- 10 Mistakes to Avoid When Installing Faux Shiplap by Top Shelf DIY
- A jaw-droppingly gorgeous Herringbone Accent Wall from the sisters at Shanty-to-Chic
- A DIY Shiplap Tutorial, from Right Up My Alley.
Good luck!

I have a bedroom in the basement, what is the best way to cover a cinder block wall.
Can you include a link to the planking product you used for this project?